Physical Address
3260 College Rd, Fairbanks, Alaska

By Derek V. Mackown | IT Technician & Display Hardware Specialist
Touch unresponsiveness is one of the most disorienting phone failures to troubleshoot because there’s no visual artifact to examine. The screen looks perfectly fine. The display is on. Everything appears normal, except nothing responds when you tap it. And without touch, most diagnostic tools are inaccessible.
The failure can sit anywhere across three completely separate layers: the software stack that interprets touch input, the digitizer hardware that captures it or the physical conditions moisture, temperature, screen protector interference, that prevent the digitizer from receiving clean signals in the first place. Each layer requires a different diagnostic approach and produces a different resolution.
The five diagnostics below are structured as sequential tests. Each one produces a clear answer that either resolves the problem or tells you exactly where to look next. Work through them in order, the sequence matters because each test eliminates a variable that the next test assumes has already been ruled out.
Table of Contents
ToggleBefore any diagnostic, it’s worth knowing what the touch system actually consists of, because the fix for a software-layer failure looks completely different from the fix for a digitizer hardware failure, and you need to know which one you’re dealing with.
Modern smartphones use capacitive touch digitizers; a grid of transparent electrodes laminated beneath the display glass. Your finger’s electrical capacitance disturbs the electromagnetic field across this grid, and the touch controller IC calculates the exact coordinates of that disturbance. The controller sends those coordinates to the operating system’s input stack, which routes them to the appropriate app.
This chain has four failure points:
Each of the five diagnostics below targets one or more of these failure points specifically.
Time required: 2 minutes What it rules out: Physical layer blocking capacitive signal moisture, screen protector incompatibility, environmental conditions
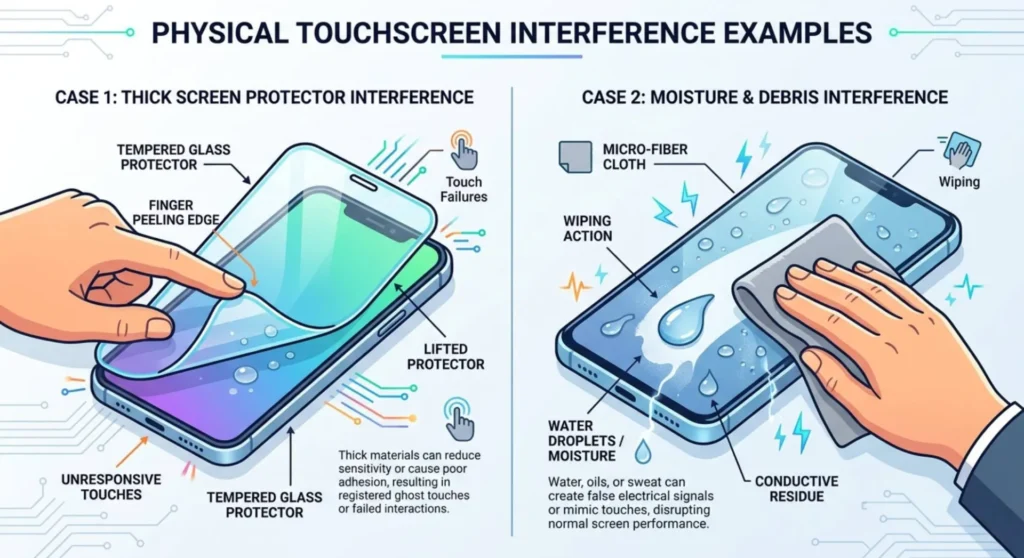
This diagnostic comes first because it’s the most commonly overlooked cause and the fastest to eliminate. Capacitive digitizers require direct or near-direct contact with a conductive surface your fingertip. Anything that insulates that contact disrupts the signal.
Run these checks before anything else:
Dry your hands and the screen surface completely. Even minor moisture from humidity, sweaty palms, or a slightly damp cloth used to clean the screen, changes the capacitive field unpredictably. Moisture on the screen surface is indistinguishable at the hardware level from multiple simultaneous touches, which causes many phones to lock out input entirely as a protection against false touch storms.
Remove any screen protector currently installed and test touch response directly on the bare glass. Thick tempered glass protectors, particularly those with a raised lip around the edges, increase the air gap between your finger and the digitizer. Some third-party protectors particularly cheap, poorly fitted ones, reduce touch sensitivity enough to produce effectively unresponsive behavior in areas where the protector doesn’t lie flat against the glass.
Test in a different temperature environment. Below approximately 0°C (32°F), the skin on fingertips loses enough conductivity to reduce capacitive signal strength significantly. Cold-weather touch unresponsiveness is real and documented, it’s why most modern phones have a “glove mode” or touch sensitivity enhancement setting. Warm your hands and test again.
Check whether gloves are involved. Standard fabric gloves are not capacitive. Only gloves specifically marketed as “touchscreen compatible” (with conductive fiber woven into the fingertip area) work reliably with capacitive screens.
Verdict:
Time required: 3 minutes What it rules out: OS input stack crash, frozen touch driver process, app-layer lock
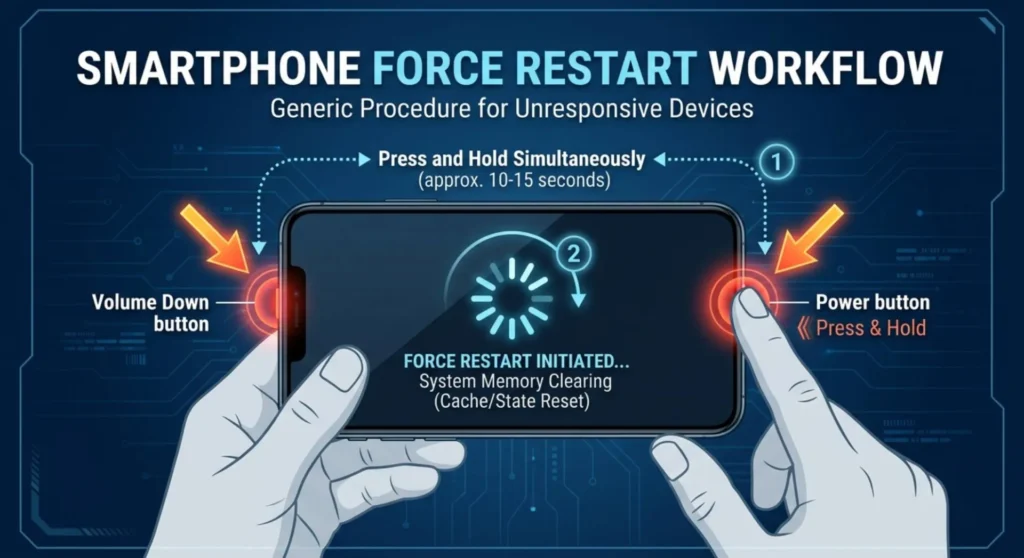
A force restart is not a normal power cycle. It clears all volatile memory including the OS input stack processes, the software components that receive touch coordinates from the touch controller and route them to applications. When these processes crash or deadlock, the digitizer hardware continues functioning, but its output goes nowhere. The screen appears on, the display is working, and touch hardware is sending signals, but the software isn’t processing them.
This is more common than it sounds. Memory leaks in apps, particularly games and apps that use aggressive background processing, can exhaust the input processing thread pool, causing the entire touch input system to become unresponsive while the visual display layer continues rendering normally.
| Device | Force Restart Method |
|---|---|
| iPhone 8 / SE (2nd/3rd gen) and later | Quickly press and release Volume Up → quickly press and release Volume Down → hold the Side button until the Apple logo appears (ignore the power-off slider) |
| iPhone 7 / 7 Plus | Hold Volume Down + Sleep/Wake simultaneously for 10 seconds until Apple logo appears |
| iPhone 6s and earlier | Hold Home + Sleep/Wake simultaneously for 10 seconds |
| Samsung Galaxy (One UI) | Hold Power + Volume Down simultaneously for 7–10 seconds until Samsung logo appears |
| Google Pixel | Hold the Power button for at least 30 seconds |
| OnePlus | Hold Power + Volume Down for 8 seconds |
| Xiaomi / POCO / Redmi | Hold Power + Volume Down for 8–10 seconds |
| OPPO / Realme | Hold Power + Volume Down for 10 seconds |
| Huawei / Honor | Hold Power + Volume Down for 10 seconds |
If you can’t use the touchscreen to initiate a restart: Use the physical button combination above directly, none of these methods require screen interaction. If your phone has a power button accessible from the lock screen, hold it until the device shows restart behavior or the manufacturer logo.
After the force restart, test touch response immediately before opening any app by swiping across the lock screen.
Verdict:
Time required: 5 minutes What it rules out: Digitizer hardware zone failure, flex cable damage, touch controller IC partial failure
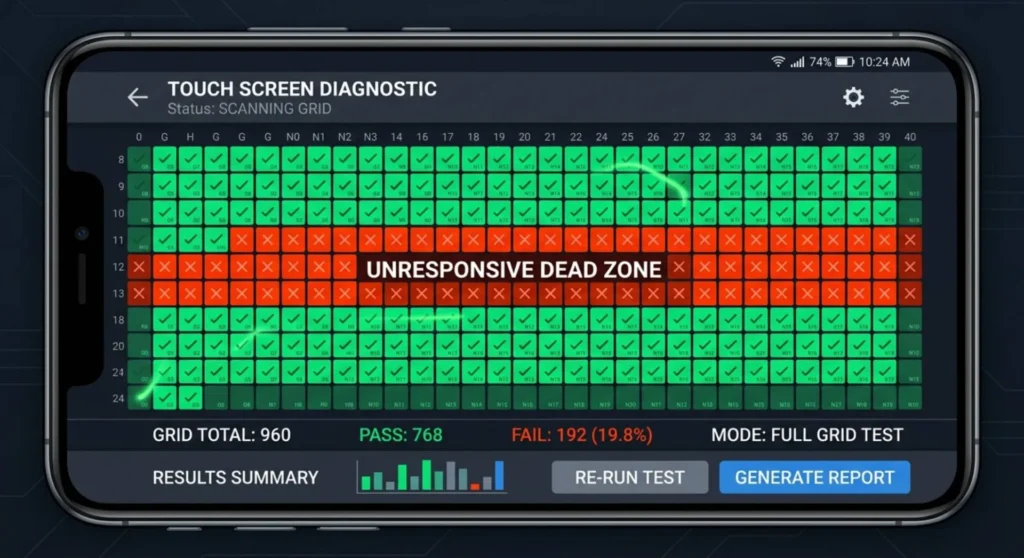
This diagnostic separate complete touch failure from zone-specific touch failure and that distinction completely changes the probable cause and the resolution path. Zone-specific failures (certain areas of the screen unresponsive while others work) indicate hardware damage at the digitizer or flex cable level. Complete failures across the entire screen are more likely to be software, touch controller, or connector related.
The zone mapping method:
If any touch at all is registering, open the phone’s built-in touch test or use a downloaded touch test app. The fastest built-in access:
| Device | Touch Test Path |
|---|---|
| Samsung Galaxy | Dial pad → type *#0*# → touch Touch in the diagnostic menu |
| iPhone | No built-in touch test accessible without prior configuration. Download Touch Test from the App Store if you have partial touch function |
| Xiaomi / POCO | Dial pad → *#*#6484#*#* → touch panel diagnostics |
| OnePlus | Settings → System → Diagnostic → Display → Touch |
| Google Pixel | No built-in touch map test. Use Play Store touch test app |
| Huawei | Dial pad → *#*#2846579#*#* → Project menu → Touch sensor |
In the touch test, draw across every area of the screen all four corners, both edges, the center, and the bottom area near the home indicator. Note which zones register and which don’t.
Interpreting the zone map:
A single dead zone particularly along one edge or in a horizontal band across the screen is the characteristic failure pattern of a partially disconnected digitizer flex cable. The digitizer is organized in a grid, and cable damage or connector displacement produces zone failures that follow the grid geometry rather than random patterns.
A dead zone specifically along the bottom 10 – 15% of the screen, where the earpiece speaker, front camera, or home button area sits, is often caused by impact damage at the top of the phone (where the display assembly’s flex cables attach to the logic board) rather than at the point where the dead zone appears. The digitizer flex routes from top to bottom, damage at the connection point produces failure at the far end of the cable run.
Verdict:
Time required: 10 minutes What it rules out: Third-party app conflict with the touch input stack, rogue accessibility service, overlay app blocking input
If touch is completely unresponsive across the entire screen and a force restart didn’t resolve it, a third-party application running in the background may be intercepting touch input before it reaches the intended destination. This happens most commonly with:
Safe Mode disables all third-party apps and their associated services while keeping the base OS functional. If touch responds in Safe Mode, a third-party app is definitively the cause.
Entering Safe Mode:
Android (most manufacturers): Hold the Power button → when the power menu appears, long-press the Power off option on screen until a “Safe mode” prompt appears → tap to confirm. The device restarts into Safe Mode, indicated by “Safe mode” text in the bottom-left corner.
Samsung Galaxy specific: Hold Power + Volume Down to force restart → immediately after the Samsung logo appears, hold the Volume Down button until the device finishes booting → “Safe mode” appears bottom-left.
iPhone: iOS does not have a traditional Safe Mode. The equivalent on iPhone is a factory reset (see the hardware assessment section), iOS’s sandboxed app architecture prevents most app conflicts from affecting system-level touch input, making app-caused complete touch unresponsiveness significantly rarer on iPhone than Android.
In Safe Mode, test touch across the full screen using the zone mapping method from Diagnostic 3.
If touch responds correctly in Safe Mode: An installed app is responsible. Exit Safe Mode, go to Settings → Apps → sort by “Last installed” → begin uninstalling the most recently installed apps one at a time, testing touch after each removal. Accessibility services that have been granted input permissions deserve particular scrutiny, check Settings → Accessibility → Installed services and disable any that don’t need to be active.
Verdict:
Time required: 15 minutes of passive waiting What it rules out: Liquid ingress affecting the digitizer controller, extreme battery discharge affecting touch IC power, thermal damage causing temporary controller shutdown
Three environmental conditions can produce complete touch unresponsiveness that resolves without any repair and each requires waiting rather than active intervention. This diagnostic runs them as a protocol.
Moisture ingress assessment:
If the device has been exposed to rain, condensation, a humid environment, or was recently submerged (even within its IP rating, IP ratings cover brief immersion, not prolonged exposure), moisture may have reached the touch controller IC or its flex connection points. Moisture in the touch controller circuit doesn’t necessarily trigger the liquid damage indicators, it can enter through the speaker grille or charging port without reaching the sensor strips.
If the device was significantly exposed to liquid: leave it powered off for 24 – 48 hours before attempting to power on. Attempting to use a wet device accelerates corrosion of the touch controller IC contacts.
Battery discharge assessment:
Some phones route the touch controller IC through a power management circuit that behaves unexpectedly when battery charge drops below 3 – 5%. If the device was completely discharged before the touch failure began:
This is specific to certain Qualcomm Snapdragon power management configurations and is documented on specific Samsung Galaxy and OnePlus models. The touch IC doesn’t receive adequate voltage below a critical battery threshold and stops responding, resolving completely once the battery reaches a minimum charge level.
Thermal shutdown assessment:
OLED panels and touch controller ICs have operating temperature limits. A phone that has been in direct sunlight, in a hot car, or running a GPU-intensive task at high ambient temperature may have triggered a thermal protection shutdown of the touch system. The display continues to work (the display IC has a higher thermal tolerance) while touch input is suspended.
Verdict:
If touch remains unresponsive after all five diagnostics, the failure is confirmed hardware at one of two levels:
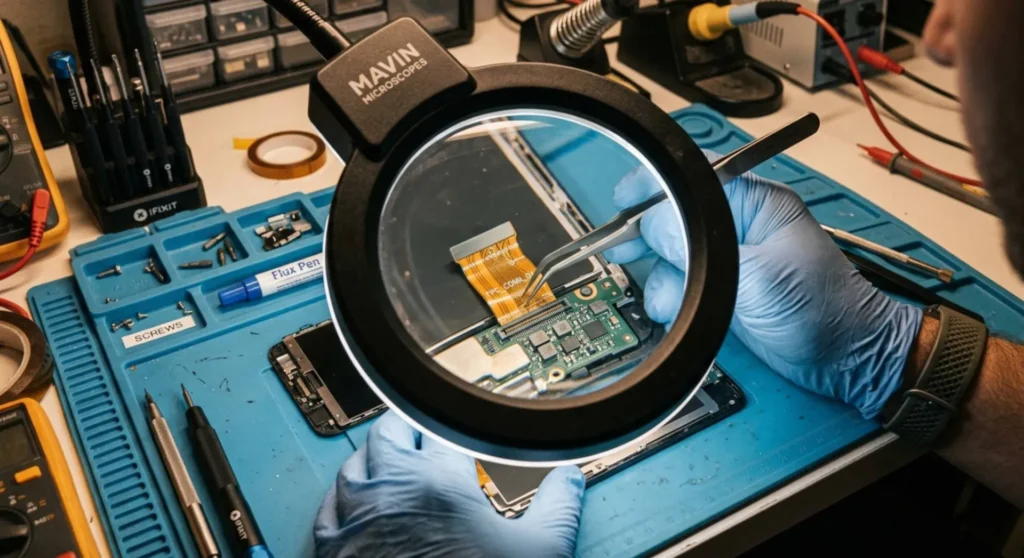
Digitizer and display assembly failure — the digitizer layer, touch controller IC, or their flex cable connections have failed at the component level. This is the most common hardware cause and is addressed by display assembly replacement. On most modern smartphones, the digitizer is bonded directly to the OLED panel and cannot be replaced independently, the full display assembly is the replacement unit.
Logic board touch controller failure — the touch controller IC is mounted directly on the logic board rather than on the display assembly on certain devices (some iPhone models, certain Samsung flagships). In this case, display assembly replacement will not resolve the issue, the logic board itself requires micro-soldering repair or replacement. This is a significantly more expensive repair and requires a technician with board-level repair capability.
How to distinguish them: If the device works with an external stylus or Apple Pencil (on iPad/iPhone) but not with finger touch, the digitizer is functional and the capacitive sensing layer specifically has failed, pointing toward the touch controller IC. If neither finger nor stylus produces any response, the digitizer layer itself has failed.
Before paying for any repair, verify warranty status. Touch unresponsiveness without physical damage is a manufacturing defect claim under warranty.
| Repair Type | OEM Service | Authorized Third-Party | Independent |
|---|---|---|---|
| iPhone display assembly (touch + screen) | $199 – $379 | $130 – $250 | $80 – $180 |
| Samsung Galaxy display assembly | $150 – $320 | $100 – $220 | $70 – $160 |
| Google Pixel display assembly | $149 – $269 | $100 – $190 | $65 – $140 |
| Logic board touch IC repair (micro-solder) | Not typically offered | $120 – $220 | $80 – $160 |
Screen protector note for post-repair: After display assembly replacement, reinstall only a properly fitted protector made specifically for your model number. Universal-fit protectors that don’t reach the screen edges create an air gap that reduces touch sensitivity, a common cause of “my new screen feels less responsive than the old one” complaints that aren’t actually screen quality issues.
Q: My screen responds to touch in some areas but not others. Will a software fix help?
Zone-specific failure is almost exclusively a hardware issue, digitizer flex cable damage, connector displacement, or panel-level damage. Software operates on the entire touch input system uniformly; it cannot resolve a failure in one physical zone of the digitizer while leaving others functional. The zone mapping test in Diagnostic 3 will confirm this. If specific zones are confirmed dead, proceed directly to hardware assessment and skip the software diagnostics.
Q: My phone fell and now the screen works perfectly but touch doesn’t respond at all. The glass isn’t cracked. Is the screen broken?
Not necessarily the screen but hardware is almost certainly involved. Impact can displace the digitizer flex cable connector at the logic board connection point without cracking the display glass. The display continues working because it has a separate flex connection; touch fails because its connection was displaced. This is repairable without full display assembly replacement if the connector is the only damage, a technician can reseat the connector for significantly less than a full display replacement. Have it inspected before authorizing a full screen replacement.
Q: Ghost touches are appearing, the screen is registering touches I’m not making. Is this the same problem?
Ghost touches are the opposite failure mode from unresponsiveness but often share the same root causes, moisture on the screen surface, a poorly fitted screen protector creating false capacitive signals, or a partially failed digitizer sending noise to the touch controller. Start with Diagnostic 1 (surface interference) for ghost touches. If ghost touches persist on a clean, dry, unprotected screen, the digitizer is generating false signals internally, a hardware failure requiring display assembly replacement.
Q: My phone gets ghost touches only while charging. What causes that?
Electrical noise from a non-OEM or damaged charger introduces interference into the device’s ground plane, which the capacitive digitizer interprets as touch input. The digitizer uses extremely low electrical currents to detect capacitive changes, charger noise at the wrong frequency can overwhelm the legitimate signal. Test with the OEM charger or a certified MFi/USB-IF charger. If ghost touches occur only with one specific charger, that charger is generating excessive electrical noise and should be replaced.
Q: I dropped my phone in water. Touch worked fine for an hour, then stopped. Why the delay?
Liquid ingress corrosion is not instantaneous. Water that reaches a contact point on the touch controller IC or digitizer flex connector begins an oxidation process that takes minutes to hours to progress far enough to disrupt the electrical contact. The initial immersion may not have bridged any critical contacts, but as the water evaporates, the minerals it carries concentrate at the contact points and the corrosion front advances. The one-hour delay you experienced is textbook corrosion progression. Power off the device immediately, leave it off, and have it inspected for corrosion cleaning before the oxidation progresses further.

Derek V. Mackown is a veteran IT Technician and Display Hardware Specialist with over a decade of hands-on experience troubleshooting complex software-hardware interface glitches. He specializes in Windows OS display architecture, driver calibration, and panel diagnostics. Driven by a passion for pixel-perfect performance, he writes highly analytical, step-by-step guides to help everyday users achieve absolute display clarity at AurumScreen.com.